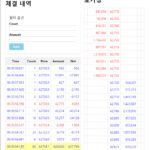
이전 바이낸스(Binance) 웹 소켓을 이용한 트레이딩 환경 구축(2) – 체결 내역 글에서는 바이낸스 웹 소켓 데이터를 호출하고 웹 페이지에 띄우는 기본적인 과정을 진행했습니다. 하지만 지속적으로 데이터를 받아오는 과정에서 렉을 유발하고, 처음 목적인 트레이딩 보조에 맞지 않습니다.
이번 글에서는 몇 가지 코드를 개선하고, 트레이딩 보조에 조금 더 적합한 형태로 만들어 보겠습니다.
코드 개선
PYTHON 수정
# app.py

async def future_trades_socket():
...
...
    while True:
        try:
            trades = await bs.watch_trades(symbol=symbol)
            time = trades[-1]['datetime']
            count = len(trades)
            price = trades[-1]['price']
            amount = 0
            diff = 0

            for trade in trades:
                amount += trade['cost']
                if trade['side'] == 'buy':
                    net += trade['cost']
                else:
                    net -= trade['cost']

            socketio.emit('trades', {
                'time': time,
                'count': count,
                'price': price,
                'amount': amount,
                'net': net,
            })
            await asyncio.sleep(0.25)

        except Exception as e:
            print("An error occurred:", e)
breakapp.py의 while문 내에try-except구문을 추가하여 코드의 안정성을 향상시켰습니다.- 순 매수를 의미하는 net을 계산해주기 위해 코드를 수정했습니다.
- 호출 사이에 0.25초의 딜레이를 주기 위해
await asyncio.sleep(0.25)을 추가했습니다.
JS 수정
// static/socket.js
...
...
function updateTrades(data) {
  var table = document.getElementById("tradesTable");
  var rowCount = table.rows.length;

  var time = data["time"];
  var count = data["count"];
  var price = parseFloat(data["price"]);
  var amount = parseFloat(data["amount"]);
  var net= parseFloat(data["net"]);

  var row = table.insertRow(1);
  row.insertCell(0).innerHTML = convertToKSTAndFormatTime(time);
  row.insertCell(1).innerHTML = count;
  row.insertCell(2).innerHTML = price.toFixed(1);
  row.insertCell(3).innerHTML = Math.round(amount).toLocaleString("en-US");
  row.insertCell(4).innerHTML = Math.round(net).toLocaleString("en-US");

  if (net > 0) {
    row.classList.add("positive");
  } else {
    row.classList.add("negative");
  }

  if (rowCount > 20) {
    table.deleteRow(-1);
  }
}rowCount로 체결 내역 개수를 받고, 20개 이상이 되면 마지막 Row를 삭제합니다.
HTML 수정
<!-- templates/index.html -->
<head>
...
...
    <link
      rel="stylesheet"
      type="text/css"
      href="{{ url_for('static', filename='style.css') }}"
    />
</head>
...
...
    <div id ="trades">
      <h1>체결 내역</h1>
      <table id="tradesTable">
        <tr>
          <th>Time</th>
          <th>Count</th>
          <th>Price</th>
          <th>Amount</th>
          <th>Net</th>
        </tr>
      </table>
</div>- CSS 파일 로드
- Net column 추가
CSS 작성
/* static/style.css */
#trades {
  width: 400px;
}

#tradesTable {
  width: 100%;
  border-collapse: collapse;
}

th {
  text-align: center;
  background-color: #f2f2f2;
  padding: 8px;
  border: 1px solid #ddd;
}

td {
  text-align: right;
  padding: 8px;
  border: 1px solid #ddd;
}
체결량 필터
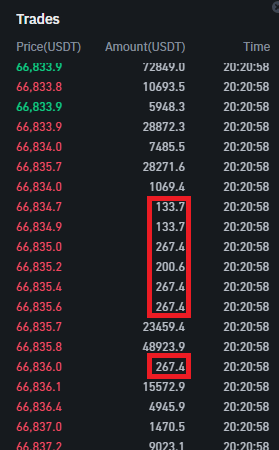
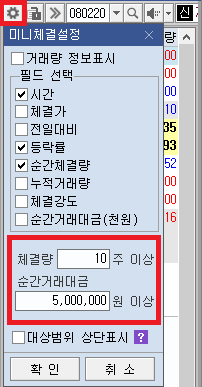
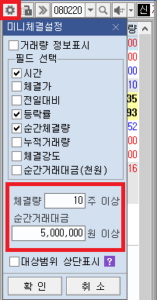
매우 작은 거래 대금은 추세에 영향을 주지 않는 잡음으로, 중요한 데이터를 가리고 눈에 피로를 줍니다. 이를 해결하기 위해 체결량 필터 기능을 구현하여 잡음을 제거할 수 있습니다.
HTML 수정
// templates/index.html
...
...
  <body>
    <div id="trades">
      <h1>체결 내역</h1>
      <form id="filterForm">
        <div>필터 옵션</div>
        <label for="filterCount">Count</label>
        <input type="number" id="filterCount" name="count" min="0" />
        <label for="filterAmount">Amount</label>
        <input type="number" id="filterAmount" name="amount" min="0" />
        <button type="button" onclick="updateFilterOptions()">
          Apply
        </button>
      </form>
      ...
      ...
    </div>
  </body>
체결량 필터 설정창을 작성해줍니다. Apply 버튼을 누르면 이후 socket.js에서 작성할 updateFilterOptions()를 실행하게 되고 socket.js에서 index.html의 input 값을 받아올 수 있습니다.
JS 수정
// static/socket.js

var filterOptions = {
  count: 0,
  amount: 0,
};

function validateFilterInput(value) {
  if (!value || value < 0) {
    return 0;
  } else {
    return value;
  }
}

function updateFilterOptions() {
  count = parseInt(document.getElementById("filterCount").value);
  amount = parseInt(document.getElementById("filterAmount").value);

  filterOptions.count = validateFilterInput(count);
  filterOptions.amount = validateFilterInput(amount);
}

...
...

function updateTrades(data) {
  ...
  ...
  if (amount > filterOptions.amount && count > filterOptions.count) {
    var row = table.insertRow(1);
    row.insertCell(0).innerHTML = convertToKSTAndFormatTime(time);
    row.insertCell(1).innerHTML = count;
    row.insertCell(2).innerHTML = price.toFixed(1);
    row.insertCell(3).innerHTML = Math.round(amount).toLocaleString("en-US");
    row.insertCell(4).innerHTML = Math.round(net).toLocaleString("en-US");

    if (rowCount > 20) {
      table.deleteRow(-1);
    }
  }
}validateFilterInput()에서 데이터 검증을 실시한 후 filterOptions에 저장합니다. updateTrades()함수에선 조건문을 통해 데이터를 필터링 해줍니다.
CSS 수정
style.css 전체 코드 입니다.
// static/style.css

/* trades */
#trades {
  width: 400px;
}

#tradesTable {
  width: 100%;
  border-collapse: collapse;
}

th {
  text-align: center;
  background-color: #f2f2f2;
  padding: 8px;
  border: 1px solid #ddd;
}

td {
  text-align: right;
  padding: 8px;
  border: 1px solid #ddd;
}

/* tradesFilterOptions */
#filterForm {
  background-color: #ffffff;
  padding: 20px;
  border-radius: 5px;
  box-shadow: 0 2px 4px rgba(0, 0, 0, 0.1);
  margin-bottom: 20px;
}

#filterForm div {
  font-size: 18px;
  margin-bottom: 10px;
}

label {
  font-weight: bold;
  display: block;
}

input[type="number"] {
  width: calc(100% - 12px);
  padding: 5px;
  border: 1px solid #ccc;
  border-radius: 3px;
  margin-bottom: 10px;
}

button {
  padding: 10px 20px;
  background-color: #87ceeb;
  color: #ffffff;
  font-weight: bold;
  border: none;
  border-radius: 3px;
  cursor: pointer;
}

button:hover {
  background-color: #4682b4;
}

.positive {
  color: red;
}

.negative {
  color: blue;
}
대량 체결 알림
배경색 설정
// static/socket.js
...
...
function updateTrades(data) {
  ...
  if (amount > filterOptions.amount && count > filterOptions.count) {
    ...
    row.insertCell(4).innerHTML = Math.round(net).toLocaleString("en-US");

    if (amount > 100000) {
      row.classList.add("large-amount");
    }

    if (amount > 1000000) {
      row.classList.add("huge-amount");
    }

    if (rowCount > 20) {
      table.deleteRow(-1);
    }
  }
}
// static/style.css
.large-amount {
background-color: rgba(255, 255, 0, 0.4);
}
@keyframes blink {
0% {
background-color: white;
}
100% {
background-color: greenyellow;
}
}
.huge-amount {
animation: blink 0.5s infinite;
}
...알림음 설정
주식 거래 환경과 유사한 환경을 구축하기 위해서 영웅문의 사운드 파일을 사용했습니다.
# static/socket.js

function updateTrades(data) {
  ...
  ...
    if (amount > 100000) {
      row.classList.add("large-amount");
      playNotificationSound(net);
    }
    ...
  }
}

function playNotificationSound(net) {
  var soundFile;
  if (net > 0) {
    soundFile = "static/sound/sound9.wav";
  } else {
    soundFile = "static/sound/sound10.wav";
  }
  var audio = new Audio(soundFile);
  audio.volume = 0.3;
  audio.play();
}
동작 확인
거래량이 많을 때는 영상과 같이 배경색과 알림음으로 직관적 판단에 도움을 받을 수 있습니다.
영상 속 가격이 다른 것은 다른 심볼(BTCUSDC/BTCUSDT)을 사용했기 때문입니다.
작성된 코드는 깃 허브에서 확인할 수 있습니다.
